Making or changing a template (the builder)
The builder is where a template is made: the questions the form asks, the words of the letter, and its letterhead and signature. You see the letter take shape beside it as you work, and nothing reaches other people until you save. This section walks through a whole template, start to finish.
To open it:
- For a new template: on the Letter templates page, select New template.
- To change a template you may change: open it and select Edit template.
- To start from a template you may only use: open it and select Make a copy (see Make a copy).
At the top, "Letter templates / New template" (or "Letter templates / Edit template") shows where you are; select Letter templates to go back to the list. Beside the title boxes are Undo, Redo and Save template, and the More menu (the button with three dots) — for a template that isn't saved yet, All letter templates instead. Below them are three tabs, Fields, Letter and Letterhead & signature, and beside the tabs the Preview of the letter.
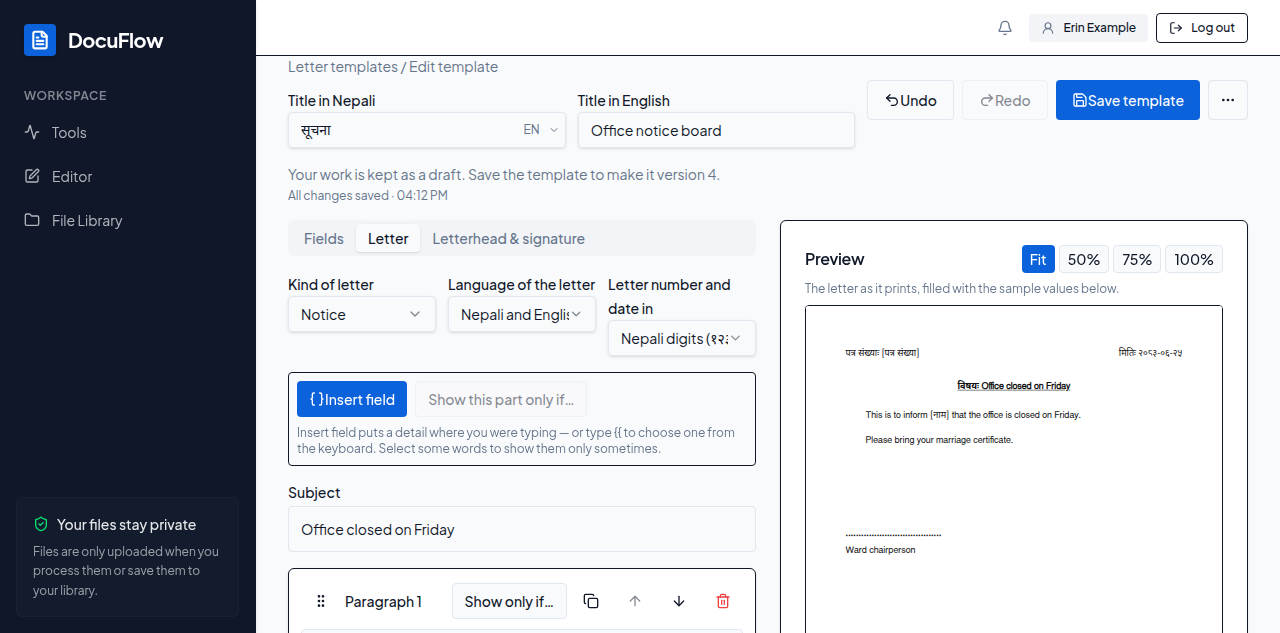 Figure: the builder — the letter on one side, the preview with its Zoom on the other, and "All changes saved" above.
You can do the tabs in any order and come back to each as often as you like. If you are new to it, follow the steps below in order.
Step 1: Name the template
- Type the title in Title in Nepali and Title in English. One of them is enough, but people see "Nepali / English" on the template's card when both are filled in. The Nepali box types Nepali (see Typing in Nepali in any field).
- Choose the Kind of letter on the Letter tab: Sifarish, Notice, Certificate, Letter or Other. The Sifarish letters card on the Tools page shows only Sifarish templates.
A new template is not empty. It starts with two fields every office letter needs — Letter no. (पत्र संख्या) and Date (मिति), both marked Must be filled in — one empty paragraph, the Workspace letterhead and a signature block. Its Kind of letter is Letter, its Language of the letter is Nepali, and its Letter number and date in is Nepali digits (१२३). Change any of these as you go.
Until you change something, the line under the title says "Give the template a title and write the letter, then save it."
Step 2: Choose the details the form asks for (the Fields tab)
"Fields are the details that change in each letter — a name, a date, an address. The person writing a letter fills them in." Each field is a card on the Fields tab, and a box in the form under Fill in the letter when someone uses the template.
To add a field:
-
Open the Fields tab and select Add a field.
-
Choose what kind of answer it takes. You can change it later with Type.
Type What the person writing the letter gets Short text A one-line box — a name, a ward number, a place Long text A box of several lines — an address, a reason Number A box that takes only a number Choice from a list A list to pick one answer from Yes or no Two buttons, हो / Yes and होइन / No Date (Bikram Sambat) A year, a month and a day to pick, in Bikram Sambat Date (AD) A date to pick, in AD -
The new card appears at the end, called "New field" (नयाँ फिल्ड), with the cursor in Label in Nepali. Type the label in Nepali, then in Label in English. The label is the question on the form, so write it the way you would ask it: "Applicant's name", not "name1".
-
If the letter makes no sense without it, turn on Must be filled in. Nobody can download or save the letter until every such field is filled in ("Fill in the required fields to enable PDF.").
-
For Choice from a list, type the answers in Choices, one per line — one answer on each line. The box starts with two examples, पहिलो and दोस्रो; replace them with your own.
-
Optionally, write Hint under the field (Nepali) and Hint under the field (English) — a short help line shown under the box, for example "As written on the citizenship certificate".
What you'll see when it's done: the card's heading shows the English label and the type ("Purpose · Choice from a list"), and the field appears under Sample values beside the preview.
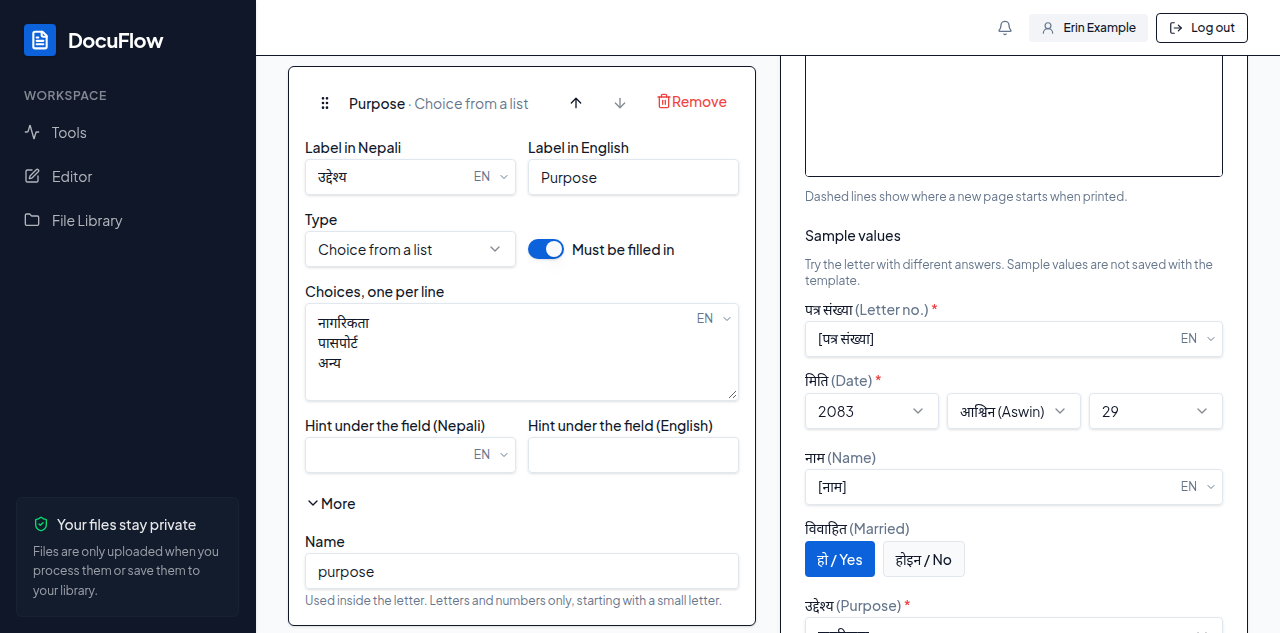 Figure: a list field filled in — the new field also appears at the bottom of the Sample values.
Its name (under More). Select More on a card to see its Name — a short word DocuFlow uses inside the letter to know which field is which ("Used inside the letter. Letters and numbers only, starting with a small letter."). A new field is called newField; you never have to change it, but a clear name such as purpose makes a long template easier to look after. Type the new name, then press Enter or leave the box. Every place in the letter that uses the field follows, and the card says how many: "Renamed in 3 places in the letter." A name that won't do is refused, with the reason under the box: "This name can't be used. Use letters and numbers only, starting with a small letter." or "Another field already has this name."
Moving and removing fields. The order of the cards is the order of the boxes on the form. To move a card, drag it by its grip (the dotted handle beside its name), or use the up and down arrow buttons on it (Move <name> up, Move <name> down). Remove takes a field away at once — if the letter still uses it, the list above the tabs says which paragraph, and Undo brings the field back.
A template can have up to 60 fields; after that Add a field is greyed out. With no fields at all, the tab says "No fields yet — select Add a field to make one."
Step 3: Write the letter (the Letter tab)
To set up the letter:
- Open the Letter tab.
- Choose the Kind of letter (see Step 1) and the Language of the letter: Nepali, English or Nepali and English.
- Choose how the letter number and date are written, in Letter number and date in: Nepali digits (१२३) or English digits (123). The person writing a letter can still switch this for their own letter.
- Type the Subject in its box ("What the letter is about").
- Type the first paragraph in the box under Paragraph 1. Select Add a paragraph for each further paragraph; it goes at the end. A template can have up to 80 paragraphs.
The text boxes of the letter type Nepali too: the EN / ने switch appears at the end of the box you are typing in (see Typing in Nepali in any field).
To put a field in the text — the part that changes in each letter, such as the applicant's name:
- Click in the text exactly where the detail should go.
- Select Insert field (in the toolbar above the subject) and choose the field.
Or, without leaving the keyboard, type
{{right there: "Insert a field" opens under the box. Type a few letters in Find a field to narrow the list (by either label or the field's name), use ↑ and ↓, and press Enter — or click the field. Esc or Tab closes the list and leaves the{{as you typed it.
What you'll see when it's done: the field sits in the text as a grey chip with its label, and the preview shows its sample value in that place.
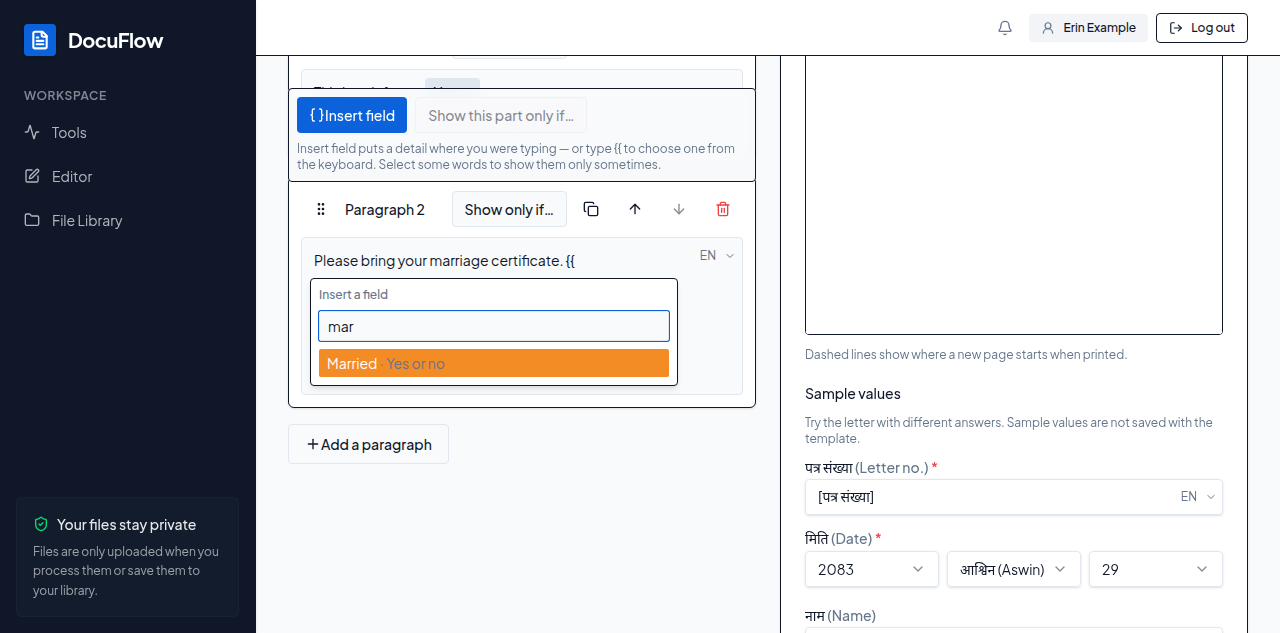 Figure: typing
 {{ in a paragraph — the list narrows as you type, and Enter puts the highlighted field in.
- With no fields yet the list says "No fields yet. Add one in the Fields tab."; when nothing matches what you typed it says "No field matches “
<what you typed>”." - With Nepali keyboard (Unicode) on,
{types र् instead: switch to EN first (Ctrl+Space), or use Insert field. With As it sounds,{{works as it is. - The toolbar's own line says what it will do: "Insert field puts a detail where you were typing — or type {{ to choose one from the keyboard. Select some words to show them only sometimes."
To choose how a field is written: select its chip. Under "Write it as", choose As typed, Nepali digits (१२३), English digits (123), CAPITAL LETTERS, and for a date Date in words (२०८१ भाद्र १२) (Bikram Sambat dates) or Long date (3 October 2026) (AD dates). The chip then shows the choice after its label. Remove in the same list takes the chip out; so does Backspace or Delete while the chip is selected. A chip whose field was removed turns red and says "Missing field" — select it: "This field was removed. Remove it here too, or add the field again."
To print a paragraph only in some letters — for example, "Please bring your marriage certificate." only when the applicant is married:
- On that paragraph, select Show only if…. A box opens: "Show only if…" — "Choose when this part of the letter is shown. Otherwise it is left out."
- Choose the field (for example Married).
- Choose the rule. For a Yes or no field: is Yes or is No. For any other field: is filled in, is left empty, is or is not — for the last two, also choose or type the answer to compare with.
- Select Apply.
What you'll see when it's done: the paragraph says "Shown only if Married is Yes", its button now reads Change rule, and Always show takes the rule off again. Letters where the rule doesn't hold leave the paragraph out.
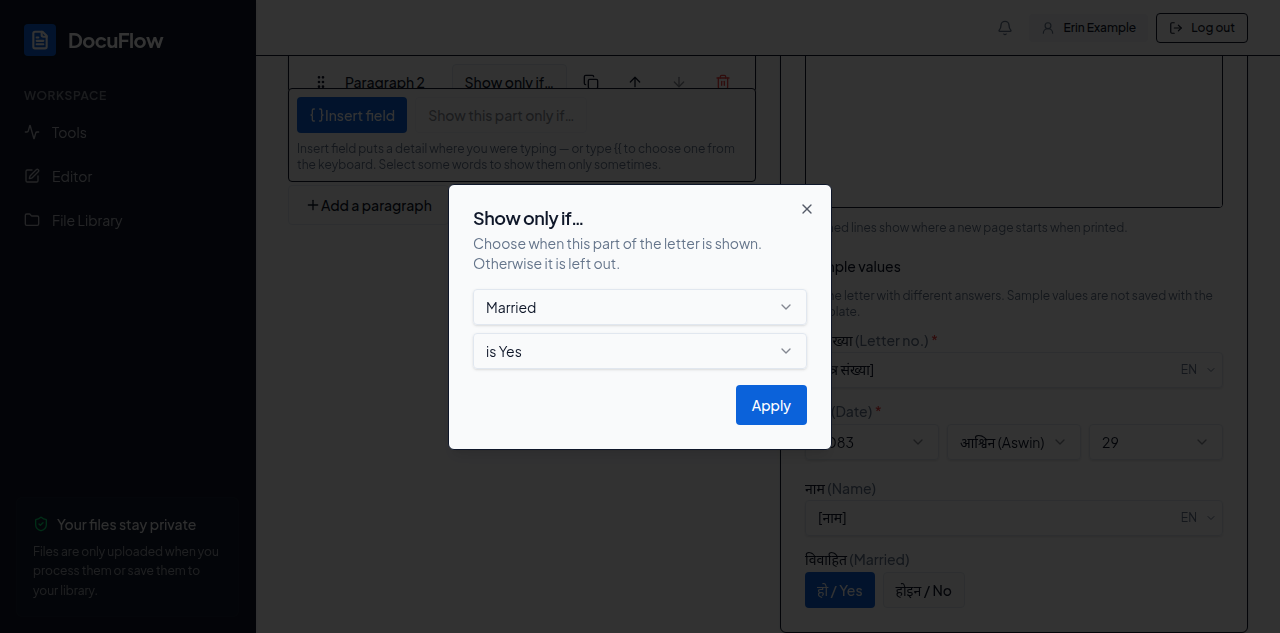 Figure: a rule for paragraph 2 — it is printed only in letters where Married is Yes.
To print only some words sometimes: select the words in the text, then select Show this part only if… in the toolbar ("Choose when the selected words are shown.") and choose the rule the same way. The words get a dashed border headed "Shown only if …", with Change rule and Remove the rule, keep the words. A rule can sit inside one other rule, not deeper: "These words are already inside two rules — a rule can only be inside one other. Select words outside the inner rule." With no fields yet, the box says "Add a field first, then choose when this shows."
To check a rule, change the answer under Sample values beside the preview (for example select होइन / No) and watch the part leave the letter.
Copying, moving and removing paragraphs:
- The copy button on a paragraph (Duplicate paragraph
<n>— the name shows when you point at it) adds a copy of it, rule included, right after it. - To move a paragraph, drag its card by the grip (the dotted handle beside "Paragraph
<n>"). From the keyboard, focus the grip, press Space, move with the arrow keys and press Space again (Esc cancels) — or use the up and down arrow buttons on the card (Move paragraph<n>up, Move paragraph<n>down). - The bin button (Remove paragraph
<n>) removes it at once; Undo brings it back.
With no paragraphs at all, the tab says "This letter has no paragraphs yet — select Add a paragraph to start writing."
Step 4: Choose the letterhead and signature
Open the Letterhead & signature tab. Under Letterhead, choose one:
- Workspace letterhead — "The one your administrator set up for everyone." It changes for every template at once when the administrator changes it.
- Our own letterhead — "A logo and lines just for this template."
- No letterhead — "For printing on paper that already has one."
To make your own letterhead:
- Select Our own letterhead.
- To add a logo, select Upload logo and choose the image ("A PNG or JPEG image, up to 1 MB."). Change logo replaces it; Remove logo takes it off.
- Type the office name in Line 1 (office name). Select Add a line for up to four lines; the bin button beside a line (Remove letterhead line
<n>) removes it. - Type the Address and the Phone, e-mail or website line.
- Choose Centre or Left for how the letterhead sits on the page.
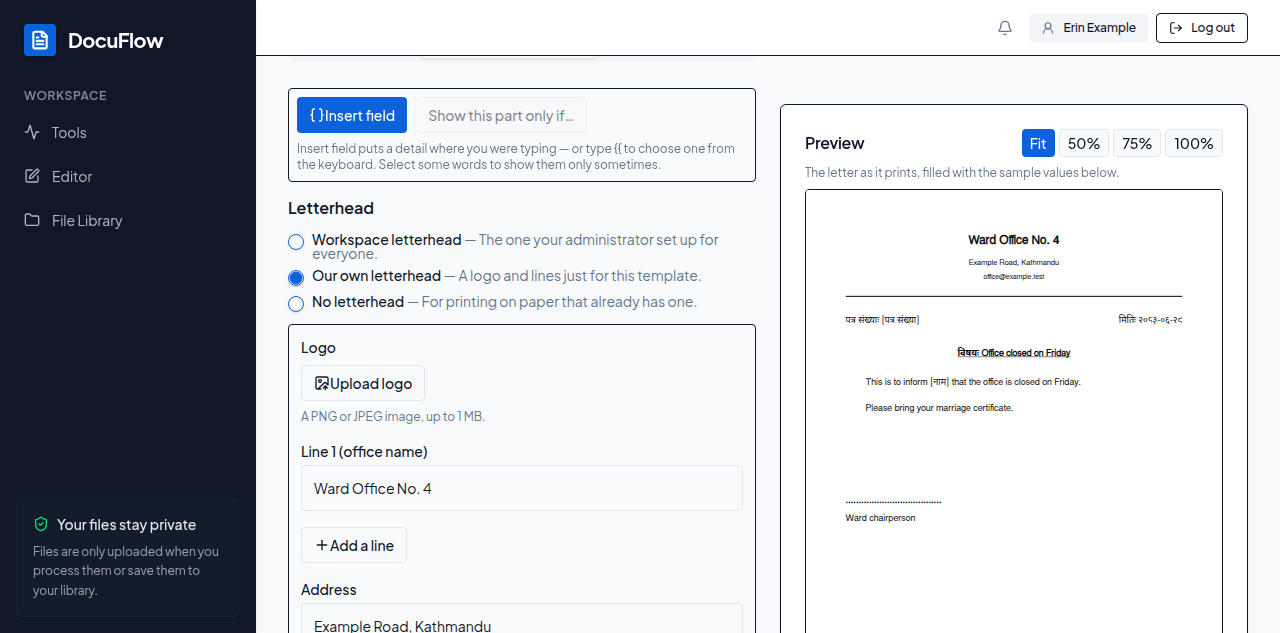 Figure: your own letterhead — each line appears at the top of the preview as you type it.
A field can go into a letterhead line or a signature line too: click in the line, then use Insert field at the top of the tab, or type {{. Until you have clicked in one, the toolbar says "Click where the field should go, then choose Insert field."
The signature:
- Keep Include a signature block on (turn it off for a letter without one).
- Type the Name of the person who signs. "Leave the name empty to print a line to sign on." — useful when different people sign.
- Type their Title (for example वडा अध्यक्ष) and Office.
- Turn on Leave space for a seal if the letter is stamped.
Step 5: Check the letter in the preview
The Preview is "The letter as it prints, filled with the sample values below." It follows every change at once.
- Sample values (under the preview) holds an answer for each field, so the letter reads like a real one: a text field shows its label in brackets, such as "[नाम]", a list its first choice, a date today's date. Change them to try the letter with different answers. "Try the letter with different answers. Sample values are not saved with the template."
- Zoom, above the preview: Fit (the page as wide as the preview), 50%, 75% or 100%. DocuFlow remembers your choice on this device.
- "Dashed lines show where a new page starts when printed." — a line marked "Page 2" shows where the letter goes onto a second sheet. The lines never print.
- On a phone, Undo, Redo, Save template and Preview sit in a bar at the bottom of the screen. Preview shows the letter instead of the tabs; select Back to editing to return.
Notes you may see under the preview:
- "Your workspace has no letterhead yet, so the preview has none. An administrator can add one in Admin → Letters."
- "The workspace letterhead couldn't be loaded, so the preview shows without it."
- "The letterhead logo couldn't be loaded, so the preview shows without it."
- If the Devanagari typeface couldn't be loaded, a red note says so; select Retry.
Step 6: Save a version
You never lose work by not saving: the builder keeps a draft as you go (see Drafts and conflicts). Saving is what makes the template usable. Each save makes a new numbered version — version 1, version 2, and so on. Letters are always written from the newest saved version; a draft is never used for a letter, and nobody else sees it. Every older version is kept, so you can look back at it or bring it back (see Version history, sharing and deleting).
Before you save, the line under Save template says what saving will do: "Your work is kept as a draft. Save the template to make it version <n>." (for a new template: "Your work is kept as a draft. Save the template to start using it."). With nothing changed it says "No changes since the last saved version."
To save:
- Select Save template.
- A box opens: "Save your template" — "Your template is saved in this workspace, ready to write letters with." for a new template, or "Save a new version" — "The template keeps every version, so you can go back to this one later." otherwise.
- Optionally, write what you changed in What changed? (optional), up to 500 characters — it is shown in the version history.
- Select Save template in the box (or Cancel).
What you'll see when it's done: "Saved — version <n>" — "Your template is ready to write letters with." — with Use this template, which opens the letter page. The line under Save template says "Saved — version <n>." with the same link.
When Save template is greyed out, the line under it says why:
- "Fix what is listed below, then save." — the list "Fix these before saving:" above the tabs names each problem, the same sentence appears beside the part it is about, and a red dot marks the tab. A new, untouched builder shows no problems; they appear once you start editing.
- "No changes since the last saved version."
- "Choose Restore or Discard above first." — answer the "Restore your unsaved changes?" question first (see Drafts and conflicts).
- "Checking what you can do…" — DocuFlow is still finding out whether you may create templates; wait a moment.
- "Your workspace doesn't let you create templates. Ask an administrator."
- "You switched to another workspace. Switch back to the one you opened this template in to save it."
Undo and redo. Undo and Redo (next to Save template) take back a change and bring it back; the keys are Ctrl+Z and Ctrl+Shift+Z (or Ctrl+Y) — ⌘Z and ⇧⌘Z on a Mac. A burst of typing comes back as one step. Saving keeps your undo history; opening a template starts a new one.